
explicanto Authoring Platform Client Documentation
explicanto Developer Documentation for the Client of the Authoring Platform
How to build the Explicanto Server
The Explicanto Server is generated from several source libraries. Each library is available as an Eclipse project on the svn and should be imported into the Eclipse workspace. After the import is complete and you add the external libraries you can use the Ant script to build the server project.
A build of the server will result in a war file that should be uploaded into a Tomcat distribution. You need to have Tomcat 5.0.30 or higher installed. (It is possible the server will run on different application servers but this has not been tested yet - we are happy to put here additional information for various configuration if you succeeded in working with them).
The first step is to fetch all the projects from the trunk/authoring/server folder in svn repository. The projects to be obtained are:
- Libraries
- Deploy
- Bea Environment
- Bea Util
- Vidya Base
- VidyaCommon
- VidyaServer
Even if the order does not matter it is best to start with the Libraries to be able to fill in all the dependencies. The external jars will be distributed in several places:
- /Libraries
- /VidyaServer/CourseTransformator/WEB-INF/lib (create it if it doesn't exist)
- /VidyaServer/ServerLibraries (create it if it doesn't exist)
-
/VidyaServer/ServerLibraries/climp (create it if it doesn't
exist)
NOTE: the climp import funcitionality is optional as described below - /VidyaServer/ServerLibraries/reports (create it if it doesn't exist)
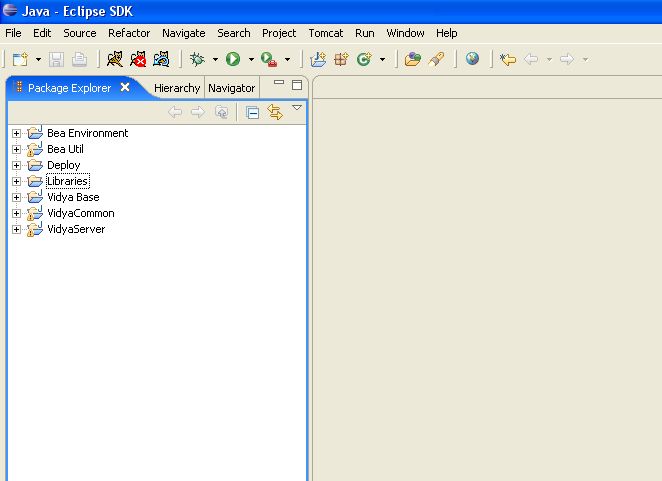
The workspace and projects should look like in the folowing images (libraries from
all the folders are automaticaly added to the project's build path):


To build the explicanto server, there is an Ant script in the Deploy project that
should be used.
The folowing steps must be covered to perform the build:
- In the build.xml file from the Deploy project set the value of the workspacehome property to the location of youre eclise workspace. Also the JAVA_HOME evironment variabile must be set.
- Create an Ant Build run configuration from Run->External Tools
- In the run configuration select the build.xml file from the Deploy projects as the buildfile
- In the targets tab of the run configuration select the folowind targets in the given order: prepare, compileWebservice, cleanup
- In the VidyaServer/xpcdb.properties you have to set the database connection settings
- In the VidyaServer/explicantoServer.properties you can set the course export information. Set the course_target_location to the ROOT/Courses folder of you're using the Tomcat instalation.
- Run the ant configuration
- Deploy the war file into your Tomcat. The war file can be found in the Deploy/build/explicanto folder
Before running the server you will have to create a database. You can select a mysql or postgresql server and use the database creation scripts from the Deploy/tools folder. After you create the database you should initialize the data and update your xpcdb.properties file with the database location and connection credentials.
Database setup
For the database you can choose between mysql and postgresql. Both databases are fully supported and have creation scripts. In order to create a new database you have to:
- Install or start the database engine
- Create a new user named xpc_user with the password xpc_pwd (of course you can choose any username or password you wish, this is only an example!)
- Create a new database named xpcdb with the xpc_user having full rights (ownership)
- Run /Deploy/tools/database-clean-db.sql script (database is mysql or postgresql)
- Run /Deploy/tools/createInitialContent.sql
- Run /Deploy/tools/settings-database.sql
- Run /Deploy/tools/initial.sql
External Libraries
Dependencies for the project Libraries:
- activation.jar
- catalina-ant.jar
- cglib2.jar
- commons-collections-3.0.jar
- commons-dbcp.jar
- commons-lang.jar
- commons-logging.jar
- commons-pool.jar
- concurrent.jar
- connector.jar
- dom.jar
- dom4j.jar
- ehcache.jar
- jaas.jar
- jaxb-api.jar
- jaxb-impl.jar
- jaxb-libs.jar
- jax-qname.jar
- jaxrpc-api.jar
- jaxrpc-impl.jar
- jaxrpc-spi.jar
- jboss-cache.jar
- jboss-common.jar
- jboss-jmx.jar
- jboss-system.jar
- jce.jar - it comes with the JRE also!
- jcs.jar
- jgroups.jar
- jta.jar
- junit.jar
- log4j.jar
- looks-1.2.1.jar
- mail.jar
- namespace.jar
- odmg.jar
- optional.jar - in the recent versions of ant this has been splited in several jars.
- oscache.jar
- proxool.jar
- relaxngDatatype.jar
- saaj-api.jar
- saaj-impl.jar
- sax.jar
- swarmcache.jar
- xalan.jar
- xerces.jar
- xercesImpl.jar
- xml-apis.jar
- xsdlib.jar
- xsltc.jar
Dependencies for the VidyaServer/CourseTransformator/WEB-INF/lib folder:
- altrmi-common-0.9.2.jar
- altrmi-registry-0.9.2.jar
- altrmi-server-impl-0.9.2.jar
- altrmi-server-interfaces-0.9.2.jar
- asm-1.4.2.jar
- avalon-framework-api-4.1.5.jar
- avalon-framework-impl-4.1.5.jar
- batik-all-1.5.1.jar
- bsf.jar
- bsf-2.3.0.jar
- castor-0.9.5.3-xml.jar
- cocoon-2.1.5.1.jar
- cocoon-batik-block.jar
- cocoon-bsf-block.jar
- cocoon-fop-block.jar
- cocoon-linkrewriter-block.jar
- cocoon-xsp-block.jar
- commons-cli-1.0.jar
- commons-collections-3.0.jar
- commons-httpclient-2.0-final.jar
- commons-io-1.0.jar
- commons-jexl-1.0-beta-1-20040113.jar
- commons-jxpath-20030909.jar
- commons-lang-2.0.jar
- commons-logging-1.0.3.jar
- excalibur-component-1.2.jar
- excalibur-event-api-1.1.jar
- excalibur-event-impl-1.1.jar
- excalibur-i18n-1.1.jar
- excalibur-instrument-1.0.jar
- excalibur-instrument-manager-1.0.jar
- excalibur-instrument-manager-interfaces-1.0.jar
- excalibur-io-1.1.jar
- excalibur-logger-1.1.jar
- excalibur-monitor-1.0.2.jar
- excalibur-naming-1.0.jar
- excalibur-pool-1.2.jar
- excalibur-sourceresolve-1.1.jar
- excalibur-store-1.0.jar
- excalibur-testcase-1.2.jar
- excalibur-xmlutil-1.0.jar
- fop-0.20.5.jar
- groovy-20040415.114632.jar
- jakarta-bcel-20040329.jar
- jakarta-oro-2.0.8.jar
- jakarta-regexp-1.3.jar
- javacApi-0.9.jar
- javacImpl-0.9.jar
- jcs-1.0-dev-20040516.jar
- jdtcore-2.1.3.jar
- jisp-2.5.1.jar
- log4j-1.2.8.jar
- logkit-1.2.2.jar
- pizza-1.1.jar
- rhino1.5r4-continuations-20040228.jar
- util.concurrent-1.3.3.jar
- xalan-2.6.0.jar
- xercesImpl-2.6.2.jar
- xml-apis.jar
- xml-commons-resolver-1.1.jar
- xreporter-expression-20030725.jar
- xsaxon8.jar
Dependencies for VidyaServer/ServerLibraries:
- bsf.jar
- c3p0-0.8.5.2.jar
- commons-io-1.0.jar
- hibernate2.jar
- jdbc2_0-stdext.jar
- mysql-connector-java-3.1.6-bin.jar
- postgresql-8.0-310.jdbc3.jar
- xalan-2.6.0.jar
Depedencies for the VidyaServer/ServerLibraries/climp:
- axis.jar
- climp.jar - This jar can be found in this folder. It comes with the distribution an it is optional. If it is not added to the server than an error will be shown when an course export is started with climp enabled.
- FTPProtocol.jar
- ibmjsse.jar
- jdom.jar
- roster.jar
Dependencies for the VidyaServer/ServerLibraries/reports folder:
- commons-beanutils-1.5.jar
- commons-collections-2.1.jar
- commons-digester-1.7.jar
- itext-1.3.1.jar
- jasperreports-1.2.0.jar
- jdt-compiler-3.1.1.jar
- tools.jar - This jar is obtained from the installed JDK.
Please pay attention to the libraries names - usually they are without numbers and are referred like that from the projects. If you are using a library with version numbers then you can either remove it or update the project (locally).
Common Build Problems
If the workspace shows errors in all the projects except Libraries and Deploy then you should do the folowing:
- Remove Bea Environmet, Bea Util, VidyaBase, VidyaCommon, VidyaServer projects from the workspace WITHOUT removing them from the filesystem. Select DO NOT DELETE CONTENT in the message box that appears when you try to delete.
- Import them back again from the current workspace using Import->Existing Projects Into Workspace
- Perform a full workspace rebuild
Make sure that the Java compiler lever is set to 1.4 or higher to avoid errors coming from the assert keyword. (there are present in the Bea Util project)
TODO
- Specify for each library a minimal version and how to get it
- Specify a build from the sources, with regeneration of the model objects
- Write a hacking howto
- Eliminate dependencies (integrate into code)
- Howto sign with your own keystore/certificates


